post

Laying Bricks – The Basics

Laying bricks is a difficult task that requires a great deal of skill. You will need tools like pointed trowels, bolster chisels, and club hammers. It would help to have a spade and a wheelbarrow for mixing mortar.

Start by mixing masonry cement or mortar. You want it to be a mix of three parts: sand and one part cement. Click https://www.bricklayerperthwa.com.au/ to learn more.

bricklayer

When constructing a brick wall, digging and preparing the foundation is important. This will ensure that the walls are level and strong, which is essential for stability. For this, you need a shovel or mortar mixer, a trowel and plenty of sand and cement. The sand must be soaked so that it is soft and pliable, while the cement should be mixed with water until it is a thick consistency.

Start by digging a trench for the foundation. The size of this will depend on the thickness of your bricks. A brick wall of a single thickness requires a foundation two courses deep, while a double brick wall will require four courses. Once the foundation is dug, fill it with concrete and allow it to set.

For best results, it is recommended to use concrete that is specially formulated for brick foundations. This will help to prevent the formation of air bubbles and promote proper mixing. Also, it is vital that the concrete is allowed to set for several days before proceeding with any other construction on your brick wall.

Make guideposts or gauging rods, which will help you to construct your brick wall straight and at the correct height. These can be made from long wooden boards or posts and should be the length of your wall. They will serve as a line to follow, and can be used in conjunction with your level or spirit level to make sure that your bricks are lined up properly.

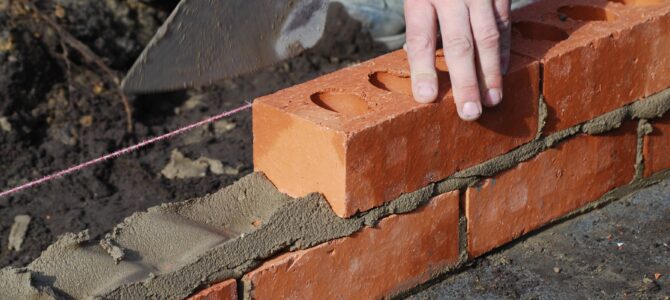
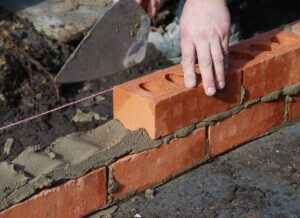
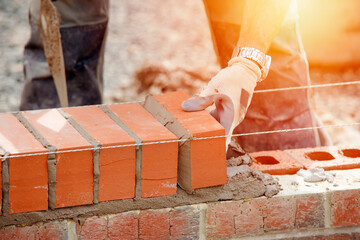
Place the first course of bricks on the foundation, using your gauging rods as a guide. Use a level to check that they are straight, and make any adjustments needed. Before placing the next brick, butter it by spreading a thin layer of mortar across its short edge. Then place the brick in position, up against the string line, and tap it down with your trowel handle to bed it into the mortar.

When laying bricks, the quality of your mortar is just as important as the bricks themselves. Mortar is a mix of sand, water and cement, and should be of the right consistency to ensure that your brickwork is solid and durable. You can get ready-mixed mortar, but it is generally a good idea to mix your own. You’ll need a wheelbarrow, a shovel and a mudboard to help you achieve the right mix ratio. To make mortar, start by adding sand and then slowly add the cement and water. Using a shovel, mix the dry materials together until they’re completely absorbed by the water. For the best results, you should aim for a consistency similar to pudding.

Once you have your mortar mixed, transfer it to the mudboard and use a trowel to mix it more thoroughly. This will give the mortar a textured surface that will grip bricks better. You can also add plasticisers and other additives to improve the strength of your mortar, but only if needed.

To begin laying your bricks, first mark out a guideline (or gauging rods) along the length of your wall. The gauging rods will help you keep your wall straight, and should be driven into the ground at each end of the structure.

After marking your guideline, lay the bottom row of bricks. When you’ve finished the first course, use a spirit level to check that it is perfectly level. Then, butter the end of the next brick with mortar and press it down against the first one. This will give the classic indention you see on most brick walls, and will also help to prevent the bottom of the brick from lifting as it gets older.

Bricklaying is a trade that takes practice to perfect. To make sure you get it right the first time, work slowly and carefully. Rushing it can lead to problems that are time consuming and difficult to sort out. A single course of bricks that is not level is easy to fix, but it is a lot more challenging to redo a wall 4 courses deep!

Ensure you have enough bricks to build your structure and that the mortar mix you have made is consistent. You don’t want it too runny or thick, so test the consistency on a piece of scrap material. If it is too runny, add more sand; if it is too thick, add water or hydrated lime (a type of additive to help with the consistency).

Begin with a row of guide bricks on either end of your footing if you have one. Stretch a string between them to make sure that the first row is straight. If you don’t have a string, use timber boards or other solid material as guides instead. These will become your gauging rods, and they will be used to check the levels of each brick later on in the course.

Butter a new brick with mortar and lay it down on the guide bricks, making sure that the ends of the brick are facing one another, not the middle. Make sure the brick is firmly in place and that there is a good amount of mortar between each edge of the brick, otherwise it will crack later on.

Continue the process for the rest of the row, being careful to align your gauging rods and level as you go. Check each row with your spirit level and tap each brick with a trowel to make sure that it is sitting correctly.

Once you’ve established the foundation and laid your first course of bricks, it is time to start building your wall. The best way to do this is by using a guideline and level. This will help to ensure that your brick wall is straight and at the correct height. You can also use gauging rods, which are long wooden boards that are driven into the ground at either end of the structure and marked with markings to show you where each course should be.

Begin by laying a bed of mortar along the line where you want your brick wall to be. Then place a brick at one end of this line, using the string line as a guide. Butter up the other end of the brick with mortar and abut it to the first brick, making sure that you have an even surface of bricks.

Continue to build the second row of bricks, always ensuring that you are following the string line and that your bricks are at the correct height. You should also remember to stagger vertical joints, as this will help to avoid weak points in the brickwork.

If you are building a very tall brick wall, it may be necessary to cut some of the bricks in half to get the right length. This can be done with a bolster chisel and lump hammer. It is important to keep checking that your brick walls are both straight and level, so make sure you use a spirit level as you build.

When you have reached the desired height of your brick wall, it is time to begin laying the paving slabs or concrete that will form the base of the structure. Ensure that these are set in evenly and are at the correct depth to give your brickwork stability and strength.

Bricks have been used for building strong and durable structures since the dawn of time. The material is resilient and easy to work with, requiring only the right tools and a little know-how to become a competent bricklayer. You will need a trowel, mortar mix, and the bricks you want to use for your project. Creating a wall from bricks is an excellent way to add both structure and visual interest to any home or garden. It is important to regularly check your brickwork for level and plumbness, using a spirit level or a mason’s line held down with pins.

A brick wall should be built up in rows, known as courses, to create the desired height of your final structure. Each course of bricks should be laid in the same manner as the first row, spreading mortar on the bottom and side of the brick, pressing firmly and checking evenness with a level.

For consistency and strength, you may need to stagger your courses of bricks. To do this, alternate half-bricks with full bricks in the second row and on both ends of the wall.

Some bricks will have to be cut in half for this pattern. This can be done by using a hammer and lump chisel. Alternatively, you could use a crowbar to split the brick in two. It is recommended that a bolster chisel be used to make the cut, as it has a stronger edge than a standard hammer.

The third row should be laid as the previous two, spreading and laying in the same way, with regular checks for level and plumbness. Once the bricks are in place, they should be “striked” with a teeming tool or other similar instrument to create the classic concave depression in the mortar. Repeat this process for the fourth, fifth, and sixth rows of your brick wall.

post

What Does a Brick Mason Do?

Using masonry materials, Brick Masons Charleston SC construct and repair walls, partitions, arches, sewers, and other structures. Their duties include:

  • Reading blueprints and plans, marking reference points, cutting materials, mixing and applying mortar.
  • brick mason

Masonry workers should have excellent problem-solving skills to deal with challenges that arise on construction sites. They must also follow safety protocols and adhere to construction schedules.

A brick mason works with masonry materials like bricks, stones, and concrete blocks to build structures. He or she may also be responsible for repairing or restoring existing masonry structures. Masonry is a time-consuming process, and masons must be able to work efficiently in order to meet construction deadlines. Typical job duties include reviewing blueprints, measuring and cutting materials, mixing mortar, laying bricks, and cleaning surfaces at the end of each day.

Brick masons use a variety of tools and machines to complete their work. These include mortar mixers, power tools, and a trowel. They may also use a spirit level and string line held down with pins to ensure that their walls are level and straight. Masons must also have a hammer and chisel for cutting bricks to fit around windows or doors. Depending on the project, brick masons may also need to apply a sealant or other protective coating to the finished product.

While brick masons typically focus on building walls, they can also build other types of masonry structures, such as patios and sidewalks. These structures are usually made from clay bricks or concrete block, and can be finished with different colors and textures. Some masons also specialize in paving brickwork, which involves using different patterns and designs to create beautiful and durable outdoor surfaces.

Masons can also work with other types of masonry materials, such as granite, marble, limestone, and tile. These materials are often used in commercial construction, such as office buildings and shopping centers. Some masons may even work on industrial projects, such as power plants and factories. These projects require specialized materials that can withstand high temperatures and heavy loads.

Cutting brick is an important skill for brick masons to have. They often work with a range of tools and machines to cut and shape bricks for construction projects. They may also be responsible for repairing and restoring existing brick structures. Their duties include reviewing blueprints and plans, spreading mortar, and working closely with other professionals to ensure that the brickwork aligns with the project specifications.

Masons use various hammers and cutting tools to fit bricks into building corners, windows, and other openings. They may also need to cut bricks with a saw to fit them into odd shapes and angles. These tasks require precise measurements and knowledge of different bonding patterns, such as running and Flemish. Masons must also be able to estimate how much brick they need for a specific job.

To prepare the brick for cutting, they should first mark the desired line with a pencil or chalk. They then score the brick along the line with a hammer and chisel. This step is important because it helps the brick break cleanly and prevents a jagged cut. The chisel should be used with a good amount of force to ensure that the brick breaks cleanly.

There are many ways to cut brick, but the most common is to use a masonry saw. This tool is designed to cut both mortar and brick, but it can be difficult to use unless you are an experienced mason. If you choose to use a circular saw, it should be fitted with a masonry blade. Otherwise, it may cause a lot of dust and debris. If you don’t have a masonry saw, you can use an angle grinder with a stone cutting wheel.

Brick masons use their skills to transform architectural designs into tangible constructions. They collaborate with other professionals such as architects, engineers, contractors, and construction workers to ensure that their work aligns with the design and meets the required standards. They also repair and restore damaged or deteriorated brick structures. This can involve removing and replacing individual bricks, repointing mortar joints, and restoring the structural integrity of the structure.

To begin a brick project, masons prepare the working area by laying a foundation and building scaffolds. They also lay a bed or layer of soft mortar on the base and then set each brick into place. They can use various bonding patterns, such as running or Flemish, depending on the project plans. They may need to cut and shape bricks, such as for curves or corners, using chisels or power tools. They also calculate the quantity of bricks and mortar needed for a particular project, taking into account wall dimensions, bonding patterns, and waste allowance.

Brickmasons must be able to read and interpret blueprints, which they use to understand the overall structure of a project. They may need to use measuring devices, such as a tape measure and level, to determine the exact size of each brick. They also need to ensure that the walls are built in a straight line and that they follow a specified pattern. They also check the location and position of openings such as doors, windows, and vents.

Masons must also adhere to safety protocols and wear personal protective equipment on the job site. They also need to know how to operate heavy equipment such as dump trucks, backhoes, and bobcats. They must also be familiar with the use of brick, concrete blocks, and natural and artificial stone.

Brick masons use mortar to bond brick, concrete blocks, stone and other construction materials together. The work is typically outdoors and requires them to follow strict measurements and specifications. Masons often collaborate with other construction professionals, including architects and engineers. This requires effective communication and teamwork skills to ensure the work meets all requirements.

Masons typically work with clay brick and concrete block, but they can also work with terra cotta, marble, granite and other natural stones. They must have well-rounded training, usually through an apprenticeship, in all phases of brick and stone masonry, including building, aligning, and joining the units.

A successful masonry project depends on the quality of the mortar used. The mason must choose the right mix of ingredients, ratios and sand type to get the best results. This is particularly important in warm weather, when the mortar can “flash set” and become unusable. In this case, the mason should add a retarder to the mixture to slow down the hydration process.

The mason must also consider the size and shape of the bricks he or she is using. Large bricks require a thicker mortar than smaller ones, and it is important to keep this in mind when mixing the mortar. It is also a good idea to use a trough or wheelbarrow to make the job easier.

The mason must also use a mudboard to mix the mortar. This is a large board that has been specially designed to hold and distribute the mortar. He or she must also ensure that the mudboard is clean to prevent contamination of the mortar. Finally, the mason must use a trowel to apply the mortar in a brick wall or structure.

Brick masons use mortar to join and support brick walls, foundations, and other structures. They apply it using trowels and power saws, and may also use mortar mixers to prepare large batches of the material. They must follow safety precautions to protect themselves from injury or exposure to harmful materials.

Masonry is a skilled trade that requires attention to detail. Brick masons must be able to read plans or blueprints and calculate the amount of material required for each job. They must also be able to cut bricks and other materials to size. They are also responsible for mixing and spreading mortar and cleaning the work area at the end of each day.

Once the mason has prepared the foundation, they begin laying bricks or blocks to create the structure. The mason begins with the corners of the foundation or floor slab and moves outward, laying each course in order from corner to corner. The first course is laid dry to allow a visual check of the dimensions against the plan, and the mason must make sure that it is level. A closure block is then placed in the final corner, and mortar spread around the edges of the opening and across the face of the closure to ensure a strong bond.

Mortar is typically made of a mix of Portland cement, sand, and water. Different ratios of each ingredient result in different strengths of mortar. Masons often use type S or N mortar, which is designed for general construction. Other types of mortar include type K, which is softer and has a low compressive strength, and type HT, which is used for high-heat applications such as fireplaces or chimneys.

Why Hire a Handyman?

Handymen typically do not require any formal education. However, there are vocational schools that offer specialized courses in specific crafts. Some handypersons also take up apprenticeships in fields like plumbing or electrical repairs.

When starting a handyperson business, it is important to market your services. This can be done through social media, by putting up flyers, or even by word of mouth. If you are looking for a handyman, you can visit or inquire on this J&R Construction.

Top 15 Reasons to Have a Handyman Service On Your Speed Dial

Over time, home fixtures such as faucets and lighting systems can wear out or break. A handyperson service can handle these jobs quickly and efficiently. They can also repair or replace the electrical systems in a house. These jobs typically don’t require a license, making them ideal handyman tasks.

While many homeowners can perform basic plumbing and electrical repairs, some need to be more comfortable doing so. If this is the case, a handyperson can do these repairs for them. These professionals can also help with more complex projects outside their expertise. In addition to repairing electrical and plumbing work, they can help with other tasks like de-cluttering basements and building movable shelves.

Another common task that handypersons often take on is tiling. This can include laying tiles in a kitchen or bathroom and replacing existing ones. They can also fix or install smart home devices like doorbells and sensors. These are great services for those who don’t want to spend the money on hiring a contractor.

Handymen often have to work on ladders to complete their tasks and may be required to work in various conditions. For example, they may be called out on a stormy day to assess leaking gutters or fix roof damages. They may be required to work in a dark or dusty environment and have to use power or hand tools.

If a person is interested in becoming a handyperson, they can start by taking a job as an apprentice to more experienced workers. They can also take vocational school courses to learn a specific skill. Many community colleges offer technical education classes for people wanting to become handymersons.

To be a successful handyman, one must have a lot of skills. They must be able to do a wide range of tasks and have a strong work ethic. In addition, they need to have the right tools and equipment to do their job. They should also have general liability insurance, protecting them from third-party claims of property damage or personal injury.

Handymen have experience with various tasks that many people need to learn how to do. They can save you time by performing the work you would have had to spend hours trying to figure out. This way, you can save yourself from frustration and avoid costly mistakes. Moreover, handypersons can save you money on repairs by identifying and fixing problems before they worsen. For example, they can identify and rectify a loose screw that could cause damage to a wall or a broken light fixture.

Handypeople often have a large network of business partners, such as suppliers and contractors, whom they can negotiate with to buy materials at a lower cost. This can help them improve their profits and provide better service to customers. In addition to this, they may be able to purchase tools and other equipment at discounted prices. Lastly, they can negotiate on the price of services that they provide.

Many handypersons are self-employed. This allows them to set their schedule and choose their clients and subcontractors. They can also hire employees and manage their finances. However, this arrangement has its drawbacks, such as being responsible for their employees’ health insurance and dealing with tax obligations.

Professional handypersons are experienced in various trades and can handle multiple projects simultaneously. They can save you the headache of hiring separate carpenters, plumbers, and painters. They can even perform work usually performed by one of these professionals.

Another advantage of handpersons is that they can work at the customer’s convenience. They can be hired at night or on weekends when stores are less crowded. This is particularly beneficial for busy office buildings, where managers and employees need more time to take care of small jobs.

If you are thinking about hiring a handyperson, be sure to ask for references. This is the best way to determine if they are trustworthy and dependable. Then, you can be confident they will do a great job and won’t leave a mess behind. In addition, be sure to check whether they are licensed and insured.

If you’re looking to save money on home repairs, handypersons can help. They have experience in various projects, from electrical repairs to plumbing maintenance. They can also help you decrease your energy costs by performing routine maintenance. For example, a handyperson can repair leaking faucets and other fixtures before they cause water damage. They can also help you improve your home’s energy efficiency by repairing insulation and ductwork.

In addition to their expertise in various areas, handypersons are trained to know how much each job should cost. This helps them avoid overcharging clients. They also know which materials to buy and which to skip, making them more efficient than homeowners who try to do it themselves.

The work schedule of a handyman will depend on the industry in which they work. Typically, they will work on weekdays and during standard business hours. They may also be required to work on weekends, especially if they are working for a commercial client. They will likely need to travel to different locations and may be required to lift heavy objects or climb ladders to complete their duties.

Some states require handypersons to have a general liability insurance policy. This is important because it protects customers from liability claims and damages caused by the contractor’s negligence. In addition to reducing the risk of costly claims, this insurance can help handypersons get jobs from companies looking for reliable contractors.

Handymen often have a large toolbox, including basic tools such as wood fillers, carpenter’s glue, and sandpaper. They also can do more advanced repairs with specialized equipment. However, they can refer you to an expert if they need to be more skilled in any particular area.

Handymen can perform various tasks but must be licensed or qualified to do major construction or remodeling work. If a task requires a license, hiring a professional contractor is best. It’s also important to check for bonding and insurance to ensure that the professional is reputable and will complete the work they’ve promised.

If you’re looking for a dependable handyperson, look up their work history and ask them for references from previous clients. These will give you a deeper insight into their punctuality and overall performance. Also, ask about their availability and how long it will take them to finish a project. This will help you decide if they are right for your job.

Handymen have vast knowledge about various kinds of repair work, so they can quickly identify what needs to be done and the required tools. This saves you the time and hassle of looking up information online and trying to fix the problem yourself. This is especially helpful when you are dealing with something complicated.

While you may know how to clean your yard or mount a TV to the wall, a handyperson can do more complex tasks like plumbing repairs and electrical installation. They can also recommend other home maintenance tasks you might have yet to consider. Handymen can also help if you are selling your house and need a quick fix-up.

A good handyperson will have an eye for detail and be able to communicate clearly with you. They should be able to provide you with a detailed plan for the job, including what tools and materials they will use and how much it will cost. Ideally, it would help if you had all of this in writing to avoid surprises.

Choosing a handyperson with an established business that works with many homeowners is important. A reputable handyperson will also be licensed and insured, which gives you peace of mind that they can handle any emergency repairs.

Finding one who fits your criteria can be challenging if you’re hiring a handyperson for the first time. However, you can avoid the hassle of searching for a qualified candidate by using pre-employment skills testing. For example, TestGorilla’s skills assessments can evaluate candidates’ technical knowledge and identify top performers quickly and accurately.

post

Floating Or Conventional Dock Installation

A sturdier dock means a safer waterfront for your family. Whether you’re building a conventional or floating dock, it’s essential to use suitable materials to ensure its longevity. For example, hot-dipped galvanized fasteners are a must to avoid rusting.Dock Installation

To install the first section, float or carry it to its location and place it on the bracket. Slide the next standard assembly onto the pipe and about to the other side of the previous section. Click Here for more details.

Whether you have a conventional dock with posts that screw into the lake bottom or a floating dock you need to have some type of support system to anchor your dock. The most common support technology used by cottage owners is augers. There are a number of different auger styles and designs available from FLOE which allows you to choose the auger that works best with your particular bottom conditions.

If your lake bottom is very dense and does not allow for much penetration you may want to employ a mud auger that allows you to get a lot of traction in the lake bed. A mud auger essentially sits on the lake bottom and grabs onto it to hold your dock in place. If you have a rocky lake bottom you can also use a base pad that is designed to work in these types of conditions. Base pads come in a variety of shapes and sizes, cupped, square, and rectangular with many of these options featuring holes or spaces within the body of the pad to increase its “grip”.

Once you have an auger installed into one end of your dock pipe, loosen the leg lock bolts and lower your new dock section into the water. Using the auger wrench, turn the auger into the dock pipe until it is secured in your lake bottom. Then tighten the leg lock bolts.

Repeat this process with the rest of your new dock sections. Once you have your entire dock assembled you can add 3′ powder coated decorative post covers which snap on to the end of the dock pipes. If you have dock pipes that extend more than 34″ above the deck, you can also cut them with a saw or pipe cutter to the proper length for your specific dock layout.

Now that your basic dock is assembled it is time to enjoy your waterfront! You will want to float your dock for a few days to make sure it is level before you add the black post caps. Lastly, we recommend marking the bracket sleeve on each of your dock sections with a magic marker so that next year you know which section to put in first.

Alumi-Span’s Large Bottom Plates

In order to have a successful dock you need a system that not only works well but is also easy to install. The biggest thing is that the sections have to be light. If the sections aren’t light the installation is going to be a huge pain and will take a long time. Old splintery, hot all-wood dock sections typically weigh 200 – 250 pounds and even more when they’re wet. If you can afford it we recommend switching to aluminum or vinyl dock sections. Our maintenance free aluminum and cedar options still have the look of traditional stained wood but don’t require any of the sanding or painting.

If you’re on a lake that has a muck bottom installing the dock in the conventional manner means augering it in until it hits something solid which can be difficult and costly. The best way to deal with muck bottoms is to use large bottom plates. These plates allow the post to sink down through the muck but they don’t stop there so that you can get your dock up on the soft bottom.

These plates can clamp anywhere up and down the post (no unreliable thumb screw) and are available in many different sizes for a wide variety of situations. You can even get them in a “two piece” casting which allows you to push the dock pole in a bit further on mucky situations.

A large plate can be installed just as you would a permanent auger but it’s much easier since there is no digging to do. We like to start the process by loosening the bolts that hold the stringer brackets on each end of the crossarm. Then we put the first standard assembly on the bottom of the plate and slide the next section over it. This gives you a good idea of where the dock is and can help avoid getting it in the wrong place.

Once the standard assemblies are on the bottom of the plates you can lift up the top section of your dock and slide it on to the bottom plate and tighten the carriage bolts. You’ll then want to float the section out to the water to finish the rest of the assembly or carry it in on a boat.

Alumi-Span’s Floating Dock

A floating dock is a staple for many waterfront properties. It can increase a property’s value, provide safe boat and water access, and help improve the experience for those who use wheelchairs or have mobility challenges. However, the dock’s installation can be a daunting task for those without professional help. Some people even pay others to do their dock installation so they don’t have to deal with the backbreaking heavy lifting that goes along with it.

Docks can be made of a variety of materials, each with its own benefits and drawbacks. For example, all-aluminum and vinyl docks are the lightest and most maintenance free. They are also a good choice for residential properties. But some people prefer the look of cedar or treated pine. In fact, Alumi-Span offers a hybrid cedar-aluminum option that saves money while providing the durability of an aluminum dock.

The material you choose should also be based on where you are going to install your dock. The type of property you have will determine the amount of space you can use as well as any governmental restrictions or fees related to the dock structure. The location will also inform what accessories and features are a good idea, such as safety railings on exceptionally rough or deep waters, or storage boxes, benches, or ladders in recreational settings.

Another thing to keep in mind is how easy your new dock will be to assemble and disassemble for winter. A lift dock is a great solution for situations where ice movement may cause damage to your existing dock. It is a deck style platform that hinges to the land and has a set of stairs to allow you to get down to the water level. It then cranks up for the winter to reduce ice movement.

Lastly, it is important to find out how much your local government or homeowner’s association requires for dock construction and placement. Some jurisdictions require permits and have specific guidelines for sizes, types, and materials of the dock. These requirements should be taken into account as they will have a significant impact on the final cost of the dock and installation.

Alumi-Span’s Conventional Dock

Many homeowners who purchase dock sections are looking for something a bit more conventional than the Perma Augers or Floating Dock. They are looking for a dock that will stand up to the elements and withstand normal wear and tear. If that is the case for you, Praklet’s Piers and Lifts has the solution: Alumi-Span’s Conventional Dock.

The basic components of this style of dock are aluminum, so they will withstand the weather without rusting or warping. Alumi-Span’s Conventional dock also offers a variety of different finishes to help you achieve the look you desire for your waterfront property. From a basic aluminum to the darker wood grain appearance, you can find what you need with this type of dock section.

One of the best things about this style of dock is that it works well in shallow water depths. The minimum amount of water needed to put in this type of dock is three or four feet. This is a great option for people who live on an inland lake and want to avoid the hassle of putting in a dock in deep water, which can be challenging for those who are using waders or a boat.

A conventional dock from Alumi-Span is constructed with a standard end section, which features a hook on the side that attaches to the lip on the previous dock section. The standard end section is then repeated to create the straight run of your dock layout. This is the most commonly used section in a dock layout, and it provides the structure for the entire platform.

Another feature of the standard end section is that it includes a mounting plate, which can be placed on top of a dock post. This is a very useful feature, especially for people who live in areas that are prone to severe storms. This mounting plate prevents the dock from moving on the surface of the water during storms, and it also helps to reduce the risk of the foundation becoming weakened or damaged.

When the time comes to replace your dock, it is important to be aware of possible problems so that you can address them in a timely manner. For instance, foundation deterioration is not only dangerous, but it could also lead to the entire dock coming crashing down into the water at the slightest nudge. In cases where the foundation is seriously compromised, it may be necessary to have a total replacement of the entire dock.

post

Getting Your Driveway Paved

If your driveway is looking old and worn out, getting it paved might be a great idea. It will add value to your property and make it look more attractive. It is also a good idea if you plan to sell your home shortly.

Paving Companies Charleston SC is essential for any paving project. Without it, water can compromise the materials and lead to cracks and other damage.

driveways

When you want a new driveway installed, the price will vary greatly depending on the type of material used. The cost will also depend on the square footage of the site and any extra work required, such as excavation or grading. You will also need to consider the size of the vehicle that you will be parking on the site. The best way to determine how much the paving will cost is to ask for quotes from multiple contractors. Choose a contractor that has experience and knowledge of the industry.

A paved driveway will increase the value of your home and enhance its aesthetic appeal. In addition, good-quality pavement will last for up to 35 years. However, it is important to understand that this type of project is expensive and will require a lot of planning. You should consult your local government to learn about the current regulations on paving driveways. You must also hire a professional to ensure the job is done correctly.

The most common paving materials for driveways are gravel and asphalt. These are durable and affordable options, but they can be prone to cracking. Moreover, if you use gravel for your driveway, you should have it regularly swept to keep it free of weeds and debris.

Another paving option that is both durable and affordable is pavers. Pavers come in various colors and designs and can be customized for your needs. They are also able to withstand heavy vehicles and weather extremes. In addition to enhancing the look of your driveway, these paving materials are also easy to maintain.

You can add decorative elements to your paving to make it more attractive. For example, you can install pretty sconces on either side of your driveway entrance for a calming, symmetrical effect. You can also add a planter to the center of your driveway to bring in some greenery. Consider adding lighting elements that glow beautifully over the driveway at night.

If you want your driveway to last a long time, it is important to choose a durable material. A good paving contractor will ensure that your driveway is constructed properly and can withstand heavy vehicles. They will also provide adequate drainage to prevent water from pooling. Standing water can damage your asphalt or concrete and cause cracks. This is why it is important to have sufficient drainage installed before laying down the asphalt.

Some of the most popular options for a driveway are asphalt and concrete. Both have advantages and disadvantages, so you will need to consider which one is best for your home. In addition, you should discuss the aesthetics of your driveway with your paving contractor to make sure that it matches the style of your house. Consider choosing a color that will complement the exterior of your home.

Whether you decide to install asphalt or concrete, it is important to find a contractor experienced in driveway paving. The right paving company will have a good reputation and be able to provide you with the best quality materials. They will also be able to offer you affordable pricing. They should be able to give you an accurate estimate of how long the job will take and what it will cost.

A paved driveway is a great way to add value to your property and improve curb appeal. It also provides a smooth surface for cars and bikes. However, it is important to choose a durable pavement material, such as pavers or bricks. Pavers are made from high-quality materials and are resistant to weather conditions. They also resist damage from oil and gas spills.

In contrast, poured concrete can be damaged by salt and other chemicals. It is also prone to cracking, and you must replace it if it starts to crack. Unlike paving stones, you can’t repair a broken section of poured concrete without leaving an obvious patch.

To make your driveway eco-friendly, consider using porous or recycled plastic pavers. These pavers are easy to maintain and can withstand the weight of heavy vehicles. They are also a good choice for people in cold climates, as they can withstand the freeze-thaw cycle.

A driveway is an essential part of a home, and it can greatly improve the value of a property. There are various options for paving driveways, including concrete, asphalt, and stone pavers. Choosing the right material depends on the homeowner’s style and needs. For example, those with stylish homes may choose a cobblestone or brick paver driveway. At the same time, those who prefer to live with nature will want to consider a permeable option that helps the ground absorb and retain water.

The choice of material also determines how long the new driveway will last. Pavement materials like gravel and concrete tend to crack or fade in the sun. Still, asphalt is more durable and resistant to weather damage. The quality of the asphalt also impacts how long it will last, and homeowners should look for a contractor who uses high-quality asphalt that will stand up to weather and traffic.

Whether you’re looking to replace an old, worn-out driveway or build a brand-new one, you should ensure the contractor you hire is licensed and insured. This will ensure you get the best results and protect yourself from scams. In addition, the contractor should have experience doing the type of work you need. For instance, if you’re interested in installing a heated driveway, choose a company specializing in that service.

Heated driveways are a great way to clear your driveway of snow and ice during the winter. These systems are powered by radiant heat cables that run underneath the surface. They are installed by cutting grooves 11/4″ to 11/2″ deep and between 1/4″ and 3/8″ wide into the existing pavement and inserting the heating cable. The wires are then sealed with a special caulking or sealant.

There are two main types of heated driveways: hydronic and electric coil systems. While hydronic systems are the more popular, electric coils are a safer and less expensive alternative. Warmzone’s ClearZone heat cable is specially designed to withstand the hot asphalt temperature and stressful compacting process that occurs during paving, making it an ideal choice for heated driveways.

Suppose you have a driveway paved with asphalt, concrete, or another hard material. In that case, the surface needs to drain water quickly. Poor drainage can damage the pavement’s surface and compromise its structural integrity. It can also lead to the growth of moss and mold. In addition, it can create a hazard for pedestrians and vehicles, and it may affect the overall value of your property.

To address these problems, professional paving contractors can install various solutions for driveways and other paved surfaces. These include French drains, channel drains, and swale systems. The drainage system should be designed to divert rainwater away from your home and into safe zones where it can soak into the soil. These systems are cost-effective and can be installed easily by a professional contractor.

You should always choose a company with experience and a good reputation. It should have a license and insurance coverage for its employees and workers. It should also have a portfolio of past projects and be willing to provide customer support. When choosing a paving company, look for past jobs near your home and check whether they have worked on a driveway like yours.

One of the most important factors in determining how long a driveway will last is drainage. If your driveway is not properly drained, it can crack and crumble over time. This can damage the foundation of your house and cause dampness in your basement or garage. In the worst case, it leaks into your living room and kitchen.

To avoid these problems, you should have a driveway built on a slope. This is especially important if you live in an area with high rainfall or a flood zone. A grading contractor can help you determine the best slope for your driveway, ensuring that rainwater flows away from it rather than pooling over it.

In addition to proper slope grading, consider installing a drain or swale in your landscape. These channels, usually covered by grass or other ground cover, allow water to flow in and out of your driveway without causing flooding. They are also a great way to prevent erosion and improve the health of your landscape.

post

Different Types of Fences

A barrier constructed of boards, masonry, wire, rails, or panels that enclose space or separate and secure parcels of land. Also called a wall or palisade.Fences

A middleman for transactions involving stolen goods. Maisey Fence LLC may alter serial numbers or deface the goods to prevent them from being recognized as stolen. A fence may also transport stolen goods to other cities where they will be less likely to be identified as such.

If you have a traditional wood fence that needs to be spruced up, try adding a planter box along it. The flower-filled boxes are easy to maintain and can be a beautiful focal point in your yard. You can also use them to grow vegetables or herbs. The wood-like planters are made of cedar, which is a durable material that can withstand extreme weather conditions. Cedar is also resistant to rot, insect damage and other invasive organisms.

If your home is decorated with Scandinavian-inspired styles, this planter box is a great option. It has a minimalistic design and is available in several soft colors to complement your decor. It is also crafted from powder coated metal, which makes it durable and long-lasting. You can use it to store flowers, plants, books, or even to corral children’s toys.

One of the best things about this planter is that it can be used indoors or outdoors. You can even place it on a balcony or patio. The planters have a simple and elegant expression, and they are easy to clean. If you want to use this planter on a deck, you can attach it to the rail using the brackets included in the kit.

The wooden-looking planter here is designed to look like a fence picket, which gives it a unique look. It has 12 pockets that you can plant with your favorite flowers or herbs. The wood is rot-resistant and can withstand harsh climates. It is also easy to assemble, making it a perfect option for those who have a limited budget or do not have the time to build their own garden.

You can transform a boring wooden fence into a garden with this unique concept. This design combines a trellis with a hanging planter and a wooden bench to create a beautiful space. The ivy growing on the trellis adds greenery and provides privacy to the space, while the white flowers provide a lovely contrast against the dark wood.

This unique idea uses planters and benches of different sizes to make a dazzling display. You can use this to decorate a large space, and it is easy to make at home with the help of a few tools. The best part is that it does not require any gardening skills to get started. You can hang a variety of containers on your fence, and you can even change the designs regularly to match your mood.

Thin Metal

If you’re looking for a modern fence that lets you see your yard but keeps the neighborhood safe, consider a corrugated metal fence. This fencing consists of prefabricated panels that come in a variety of colors and finishes to suit your home. You can also find a wide selection of gate designs and openers for these fences.

This type of metal fencing is fabricated from sheets of steel or aluminum. They’re cut to length, welded together at corners, and screwed into posts set in concrete. Many manufacturers use a galvanizing coating under the paint to protect against corrosion, and these fences can last a lifetime with minimal maintenance. Unlike wood, metal doesn’t need to be weather proofed with a waterproofing agent, but it does need to be repainted occasionally. If you want to add a natural touch, choose a metal such as corten that develops a protective coating of self-protecting rust over time and offers a rustic aesthetic.

These fences are a good choice for a contemporary or transitional design style, and they work well in suburban environments. They’re also popular for industrial and urban settings, as they lend a contemporary appearance to commercial properties. To achieve the best results, choose a color that blends with nearby architectural features and landscaping. For example, the fence shown here compliments the brick rowhouses and wrought-iron streetlights with its simple lines and understated color scheme.

These fences are easy to install, but the process requires a little patience. Unless you’re a skilled DIYer, you’ll want to let a pro handle the heavy duty solid-steel or cast iron options and the rackable tubular-aluminum ones that can be bent into a curved shape. These fences don’t require digging post holes or pouring concrete, so they’re faster to build than their wooden counterparts. But they can be vulnerable to wind, and you may need to tighten the screws periodically. To prevent dents, abrasions, and scratches, choose a coating that’s treated with UVA and UVB inhibitors.

Modern

A modern fence offers a clean, contemporary aesthetic that will complement many different types of architectural styles. Crafted with slender metal rods or bars, this fence design exudes sophistication while confidently securing your yard. This modern style may also feature tight, well-spaced slats or panels to offer seclusion from the outside world.

While this type of fencing is durable and long-lasting, it’s one of the heavier fence types. It may require a professional to install and move it around your property. However, the durability of steel fencing makes it a great choice for properties with large outdoor spaces.

The orientation of the slats in a modern fence design can change its appearance dramatically. Slats can be spaced tightly for privacy, or loosely to allow air and light to pass through. Choosing the right slat size is also important to prevent warping and rot.

Wood slats can be stained for a rich look, or left natural for a more rustic charm. This fence idea is ideal for front yards where it can set the tone for your landscape, while offering privacy and security in the back yard.

This modern fence is an eye-catcher thanks to its subtle color contrast, round top and arched gate. It’s a perfect option for homeowners who want a sophisticated, yet upscale look.

Before selecting a fence design, check with your local laws and neighborhood association guidelines if applicable. Some areas have height restrictions and specific materials that you must use. Additionally, consider how much you are willing to invest in upkeep. Simpler designs are usually easier to maintain, while more intricate lattice designs may require more frequent cleaning or repair.

Whether you’re building a new home, undergoing an extensive renovation or updating your current landscaping, the right fence is an essential component of your home’s overall architecture. A quality fence can help keep children and pets safe, define property boundaries and increase curb appeal – but it must be designed and built by professionals.

Contact us today to learn more about our fence design and installation services. We would be happy to discuss your goals and help you create a custom solution.

Traditional

The traditional fence is a simple but attractive wooden alternative to the modern panelized type. It consists of posts and rails with alternating vertical slats or “pickets” set at even intervals. This style works well with any house or garden, and can be dressed up with decorative details like post caps or pointed pickets. It’s also a good option for a mixed-use garden that includes both a vegetable plot and a flower garden, as the slats allow grass and groundcovers to poke through.

It’s the most common wood fencing option and usually one of the most affordable. For a more decorative look, try dressing it up with stain or paint. Alternating pickets mean that the fence looks solid from one side, but you can see through it from the other, making this an ideal choice for homes with adjacent neighbors.

Historically, fences served functional and aesthetic purposes, separating private property from the surrounding landscape and demarcating enclosures for public spaces such as churches or family burial plots. The fence paintings of modest gardens exemplify this sense of division, with the garden enclosed by a picket fence that extends toward the house.

In addition to their practical functions, traditional fences can make a visual statement that signals the homeowner’s resources and abilities. This sentiment can be reflected in their design and embellishments. The wrought iron fencing in a house, for example, demonstrates a willingness to incorporate high-style elements in an otherwise modest dwelling.

post

The Benefits of Hardscaping

If you’re thinking of adding Hardscaping to your landscape, it’s best to consult with a professional. They can help you plan and design your hardscape project so that it will be functional and beautiful.Hardscaping

Hardscape features like pergolas, walkways, and water can add value to your property. However, you should also consider the environmental impact of these features.

Adding hardscape features like a patio, fire pit, or walkways can add value to your property. It can also help you create a more functional outdoor space where you can relax or entertain guests. However, before you start working on a hardscaping project, it’s important to understand how it will impact the environment. These types of elements are nonliving and have a huge impact on the ecosystem around them. They can affect everything from the plants to the animals that live in your area. Moreover, they can cause damage to the soil and even change the water table. Therefore, you should choose a landscaper who can consider these issues and ensure that the project is not harmful to nature.

If you’re thinking of selling your property in the future, a well-designed hardscape can increase its value by providing additional living space for entertaining and relaxing. For example, you could build a fire pit or an outdoor kitchen to attract buyers and boost your home’s value. But remember that you must consider your budget and the quality of the materials used. Moreover, you should also consult your HOA to ensure that the addition will fit with the rest of the neighborhood’s look.

Another benefit of hardscaping is that it can make your yard more private. You can use a stone wall or a fountain to block off prying eyes and drown out your neighbors’ noises. This type of landscaping can also be beneficial for people with mobility problems. The only downside is that you will need to maintain the hardscapes regularly to keep them in good shape.

Hardscapes can also improve your property’s drainage and reduce erosion. This can reduce the amount of water that reaches your house and save on your energy bills. Hardscapes can be made of a variety of materials, including concrete, wood, and pavers. You can also opt for a natural stone material to blend with your property’s surroundings.

Besides making your garden more beautiful, hardscaping can also reduce the amount of time you spend on maintenance. You don’t have to spend time mowing or watering the grass, and you can also avoid weeding and pruning. Furthermore, hardscapes can last a long time, so they’re a great investment for your property.

It’s low maintenance

Unlike flowers and grass, hardscapes don’t need to be watered. Adding the right elements to your yard can help reduce erosion and save on water bills. For instance, using concrete or stone in areas where erosion is likely can prevent soil from being swept away and reduce the amount of water you need to use on your garden or lawn.

It’s also possible to add a number of other features that make your outdoor space more useful, such as an outside kitchen or fire pit. These kinds of additions will enable you to spend more time enjoying your outdoor space and can increase your property value.

Hardscaping features, such as walkways, patios, retaining walls, and fences, create unique textures that can diversify your landscape and add contrast with plants. They can also create focal points and define spaces. These features can be made out of a variety of materials, including stone, brick, and wood. They are also more durable than natural plant material and can be used to create a range of outdoor living spaces for entertaining and relaxing.

While adding hardscapes to your backyard can improve your property’s value, you should consider the maintenance involved with these projects. For example, if you have a pond or waterfall on your property, it’s important to ensure that the water is clean and safe for swimming. Likewise, if you have an area where you cook outdoors, it’s important to ensure that it is safe for your family and guests.

A well-planned hardscape design can reduce the amount of work that you need to do on your yard. For example, a well-built patio or deck can be the ideal place to enjoy dinner with friends and family. Moreover, it will not only add visual appeal to your home but will also extend its functionality, allowing you to enjoy your Hockessin, DE property year-round. If you are thinking of adding a hardscape to your property, be sure to get professional estimates before beginning the project. This way, you can ensure that the project will be done properly and will last for a long time.

It’s durable

In contrast to flowerbeds and other softscape elements, hardscape features are permanent fixtures that are designed to last for many years. With the right care, your patios, walkways, and other hardscapes can outlast your ownership of the property. This makes them a good choice for homeowners who are looking to increase the value of their homes. They can also help you to avoid expensive maintenance costs in the future.

Unlike plants and grass, most hardscape materials require less water to maintain their appearance. This is a huge advantage in areas that experience droughts or water shortages. Additionally, it’s a great way to cut down on waste and reduce the amount of time you spend watering your yard.

However, it’s important to note that not all hardscape materials are created equal. Certain materials, like gravel, are prone to stains from unwelcome growths such as mold and mildew. It’s important to clean these unwanted spores regularly to protect your family from health risks, prevent staining and to extend the life of your hardscapes.

Hardscaping elements like pergolas and built-in seating create both visual and physical borders that delineate the space of your landscape and help define it as a whole. Combined with other landscaping elements, hardscaping can give your garden a sense of depth and dimension that can be enjoyed year-round.

Retaining walls, pathways and other hardscape features can be used to level sloping or uneven land and improve drainage in rainy areas. This can help prevent standing water, flooding and mudslides. Additionally, it can reduce the risk of erosion by directing water flow away from the house and into other areas on the property.

Adding hardscapes to your property not only increases its curb appeal, it can add a lot of value as well. Potential buyers will appreciate the aesthetic and functional qualities of your landscape, and you may be able to ask for a higher asking price when you sell your home in the future. This is especially true if the hardscaping is beautiful and well-maintained. However, shoddy craftsmanship and poor quality materials will detract from the beauty of your landscaping, and could cause it to fall apart quickly.

It’s easy to install

Hardscaping is one of the best ways to increase your home’s value and curb appeal. It can also help with privacy by separating your yard from the street. It can include patios and decks, outdoor kitchens, stonework and water features. You can also add flower beds or decorative shrubs to compliment your hardscape. It’s important to make sure that your hardscape complements your landscaping, however, as this will ensure that your home looks balanced and attractive.

It’s a good idea to hire professionals for installing your hardscape, as it can be very difficult. This is because they will have access to the necessary equipment and tools that you may not have. Also, they can use specialized machinery that will do the job in a quicker and more effective way. It’s also a good idea to rent any equipment that you might not have, as this can save you a lot of money in the long run.

Another benefit of hardscaping is that it can make your garden or landscape look more appealing and organized. It can also encourage people to spend more time outdoors and enjoy the beauty of nature. It can also be used to create a more welcoming environment for people with disabilities or those with limited mobility.

However, it is important to note that hardscaping can have a negative impact on nature. Any kind of artificial environment can cause damage to the microsystem surrounding it, which can lead to a variety of problems. These problems can include over-watering, mildew and algae and pests.

Regardless of the benefits that hardscaping offers, it’s important to remember that it’s not as functional as softscapes. For example, a yard without a hardscape would be very boring. But with the right design, hardscapes can transform your backyard into a place where you can relax and have fun with your family and friends.

Hardscapes can be made from a wide range of materials. Bricks are a classic choice for patios and walkways, while flagstones can be used in various styles to match any architectural style. They are also durable and low-maintenance.

post

Why Choose a Chain Link Fence?

Unlike vinyl or wood fences, chain link is easy to maintain. However, it does not add the aesthetic appeal that other fencing materials provide and is less likely to increase home resale value.Chain Link Fence

Line posts are used at corners, ends, and direction change points of chain-link fences to provide their primary upholding support. They are available in both iron and concrete. Checkout https://www.maiseyfence.com/ for more information.

Whether you want to secure your home, enclose a garden area, or create recreational spaces, chain link fences offer homeowners the security and visibility they need at an affordable price. They are also easy to maintain and are a good choice for homes with children and pets.

In recent years, there has been a significant improvement in the aesthetics and product quality of residential chain link fencing. However, some homeowner associations, developers, and regulatory authorities restrict the use of chain link fences in residential neighborhoods due to a misunderstanding of this fence type’s durability and maintenance requirements.

Most residential chain link fences are constructed from galvanized steel and are available in a variety of sizes, gauges, and finishes. The galvanization process protects the fence from rust and corrosion. It also helps keep the fence strong and durable for many years to come. Unlike alternative fencing materials, chain link fences do not require regular painting or staining. In most cases, the only maintenance needed is periodic sweeping to remove debris and cobwebs. Additionally, a metal chain link fence does not attract pests or rot and is much less likely to become damaged by vandalism or weather conditions.

If privacy is a concern, the chain link fabric can be woven with vinyl slats that reduce visibility. These slats can be used to wrap posts or run along the top of the chain link mesh. You can also plant vines, shrubs, or trees alongside your residential chain link fence to provide additional concealment and enhance the beauty of your property.

In addition to reducing the cost and maintenance demands of your residential chain link fence, you can also increase the value of your home by installing privacy slats. When people see that a home is fenced with privacy slats, they know that it is a safe and attractive place to live. This is especially true if the fence contains flowers or other plants, which will make the property stand out and improve curb appeal. This is a great way to boost the overall marketability of your home for potential buyers.

Commercial

Commercial chain link fences are used in a variety of applications, including separating property lines, containing pets and children, and securing parking lots. They are also commonly found at schools, parks and sports arenas. These fences are highly versatile and can be modified to suit specific security needs. For example, barbed wire or razor tape can be incorporated into the top to deter trespassers, and mesh sizes can be changed to create different levels of visibility and airflow.

To start building a commercial chain-link fence, the installer must first locate and mark the boundary lines of the site. It is recommended that the concrete footings for terminal posts be 4 inches (10 cm) inside the property line to ensure that they don’t encroach on any adjacent properties. Next, the terminal post holes are dug. The size of the hole depends on the ground conditions. The holes should be a minimum of 8 inch (20 cm) in diameter and 30 inches (75 cm) deep with sloping sides. After the terminal posts are set, they should be covered with continuously poured concrete.

During the installation process, the installer must stretch a bottom tension wire, also known as a coil wire, between each terminal post to minimize in and out movement of the chain-link fabric. This is necessary to keep the fabric tight and prevent it from sagging over time. The installer should also secure the terminal posts and rails to each other with steel or aluminum wire with hooks on one end, called fence ties. For taller projects, intermediate horizontal rails are also added to support the fabric and provide a stable structure.

Many manufacturers offer standard heights of 3’ (three feet) to 20’ (twenty feet). For additional height, some can make custom heights for a project. However, custom orders require more steps and can lead to delays in production and delivery. A commercial chain link fence is an excellent option for business owners who want to maintain visibility of their property and keep it safe from trespassers. It is important to note, however, that it does not offer the privacy of other fencing styles.

Industrial

If you’re looking for a durable and secure fence for your industrial property, chain link is an excellent choice. This fencing is cost-efficient and offers comparable services to other types of fences. It’s also easy to install and doesn’t require any special tools. Homeowners and do it yourselfers can also install a chain link fence with some effort and a few extra tools. To get started, you need to prepare the area for the fence installation and make a list of all the materials and costs.

Depending on the needs of your business, you can choose from several different grades of chain link fences. Each grade is based on two different components: the gauge of the steel wire used to create the mesh fabric and the size of the framework or pipe tubing that’s used to create the frame. In general, commercial and industrial chain link fences use a heavier wall pipe than residential, which provides increased strength and longevity.

Once the pipe is in place, the installer adds the mesh and finishes off the fence with a top rail and gate entries. The fence is then connected to the terminal posts with steel or aluminum wires with a hook on one end, known as “fence ties.” This helps prevent the in-and-out movement of the bottom of the chain link fabric between the terminal posts. For larger fences, a bottom tension wire may also be added to reduce the movement between terminal posts.

To begin installing the fence, the installer digs holes and sets the line posts. Each post has a round, off-set side that should face the outside of the fence. The installer then fills the holes with concrete, ensuring that they’re plumb and aligned with the centers of the terminal posts. After the posts are set, they’re covered with concrete and left to cure for a few days.

When the concrete has cured, the installer can continue with the fence installation. A line post is a short piece of pipe that runs along the fence. It holds the fabric and can be secured to the line posts using fence ties or hairpin staples. Line posts are usually made from galvanized steel, although some manufacturers offer aluminized steel for applications where the zinc coating is not required.

Agriculture

For farms, ranches and agricultural facilities, chain link fences provide a way to contain livestock, protect crops from weather or pests, and create barriers around processing plants. They also help control access to areas where workers are working, and can be easily fitted with barbed wire for added security. Many chain link fencing options are available, from basic galvanized steel to more durable polymer and PVC coatings that resist rust and corrosion.

Although the biggest drawback of a chain link fence is its see-through design, there are several ways to address this issue. One option is to install privacy slats, which weave between the links and come in a variety of colors. While this does not provide 100% privacy, it drastically reduces visibility and can make a property much less visible from the street or surrounding homes. Another way to add privacy to a chain link fence is to grow greenery alongside it. Planting vines, flowers or trees will not only hide the view of those inside the home, but it will also create a peaceful ambiance and a beautiful addition to any yard or garden.

A final option is to use a mesh cover, which fits over the top of a chain link fence and adds some privacy while still maintaining visibility. This option is great for homeowners who want a little more privacy, but don’t want to commit to the maintenance required by other types of fences.

While it may not be as visually appealing as some other fence types, a chain link fence is relatively easy to maintain. The most important step is to sanitize the fence periodically with a water hose. This will remove any build-up of dirt or debris and keep the fence looking shiny and new. Other than sweeping away leaves or cobwebs, and possibly re-staining or painting once or twice a year, this is a very low maintenance fence.

post

The Importance Of Concrete Renovation

Concrete is one of the most durable building materials available, but even this sturdy material requires occasional repairs. Luckily, several repair products on the market can help concrete surfaces look like new again.

The key benefits of concrete renovation include increased durability, improved aesthetics, and safety. However, it may be necessary to replace concrete when it is beyond repair or restoration. If you are thinking of renovating a concrete project, Level Ground Excavation is ready to help.   

concrete renovationCost

Concrete is a fundamental component in modern construction. It plays a critical role in the structural integrity of commercial and residential buildings and contributes to the look and feel of these structures. But like most building materials, concrete can become damaged over time. This damage can result in weakened structural support, decreased insulative properties, and unpleasant visual defacement. It’s important to perform regular maintenance and repair concrete surfaces before the problem becomes worse.

One of the most popular options for concrete renovation is epoxy injection. This is a minimally invasive process that is used to treat small cracks and gaps in concrete structures. It works by injecting a special chemical into the structure that will create a bond and seal the crack. This method is effective for fixing minor problems and is less expensive than replacing the entire surface. However, it is not suitable for treating moving cracks or leaks. It’s also incompatible with moisture, so it’s best to address the underlying cause of the cracking before using this technique.

Another way to improve the appearance of concrete is to resurface it. This is a simple, cost-effective option for restoring concrete walkways, driveways, parking garage floors, and other structures. Resurfacing is typically performed with a cement overlay that can be stained, stenciled, or engraved to improve the appearance. It’s an ideal choice for homeowners who want to improve the look of their property without spending a lot of money.

In addition to improving the appearance of concrete, resurfacing, and restoration can help with safety issues. For example, if your concrete is cracked and uneven, it can be unsafe for pedestrians to walk on. Repairing this damage can help to improve the safety of your property and prevent injuries to visitors or employees.

The cost of resurfacing and restoration will vary depending on the type of concrete used, the size of the area being treated, and the extent of the damage. A professional contractor will be able to recommend the right solution for your home or business. They can also provide you with an estimate of the costs involved.

Appearance

Concrete surfaces are often the first thing people notice about a home or business, and their appearance has a strong impact on a property’s curb appeal. Whether you need to repair cracks or simply want to make the concrete look new again, a professional can help. Concrete restoration can add value to your home or business and make it easier to sell if you ever decide to move.

While institutional mistakes can contribute to concrete degradation, a variety of natural factors also play a role. Freeze-and-thaw cycles, soil conditions, and unforeseen periods of bad weather can hasten concrete damage. In addition, the corrosion of embedded reinforcing steel can cause serious internal damage to concrete structures.

Fortunately, many of these problems can be prevented with proper maintenance. Regular inspections and repairs can prevent minor issues from becoming major structural problems and save you money on costly repairs and replacements.

The appearance of your concrete can be improved with several techniques, including etching and staining. Etching is an acidic treatment that can remove dirt and stains from the surface of your concrete, while color staining adds a pop of color and can make your concrete look new again.

In addition to repairing cracks, you can also enhance the look of your concrete with stamped or stenciled patterns to give it a paved, cobbled, or brick-like appearance. You can also use a variety of colors to create a unique, one-of-a-kind design. To keep your concrete looking good, it’s important to apply a sealer every few years. This will help protect your concrete from stains and keep it from becoming damaged by the elements.

Durability

Concrete is a durable material that resists weathering and chemical attack while retaining its desired engineering properties. Its durability depends on several factors, including concrete ingredients, proportioning, mixing, placement, and curing practices. Proper maintenance is also necessary to prevent deterioration. This includes periodic inspections and repairs to weakened concrete. This will help prolong the life of the structure and reduce maintenance costs. In addition, it will help conserve resources and reduce waste and air pollution.

The durability of concrete restoration can be improved by using the best possible materials and professionally executing the work. In addition, it is important to ensure that the repair is compatible with the existing structure. This can be achieved by testing the compatibility of different repair materials. The test results should be analyzed to determine the best material to use in the repair.

There are several ways to restore concrete, including patching, injections, and resurfacing. The type of concrete renovation you choose will depend on the type of damage and your budget. A good contractor will explain the process and provide a written estimate before starting the work. They will also keep you updated throughout the project and address any questions or concerns that you may have.

Concrete restoration can correct a variety of problems, from sunken concrete slabs around your home to cracked sidewalks and driveways. It can also help improve your property’s curb appeal and increase its value. A well-maintained concrete surface will last longer and save you money in the long run.

Natural deterioration of concrete occurs from exposure to the elements and wear and tear over time, which can lead to cracking and spalling. Man-made forces that degrade concrete can be controlled or accelerated, and include acid leaching from soil around a support pier or accidental damage from blasting, fires, or physical impact.

Whether it’s a walkway, driveway, or parking lot, deteriorated concrete can affect the safety of pedestrians and vehicles. Concrete restoration services can help restore these surfaces to their original condition and increase their slip resistance, which is especially important during icy conditions. In addition, these services can eliminate trip hazards and create a safe environment for people of all ages and abilities.

Maintenance

Concrete repairs and maintenance are essential to maintain the durability of concrete structures. Whether the damage is structural or non-structural, regular renovation can prolong the life of your concrete and improve its appearance. In addition, a properly maintained structure can help you avoid costly replacement costs.

Several factors contribute to the deterioration of concrete. These include physical wear, changes in temperature and moisture, and structural loading. Concrete deterioration can lead to cracking, which leads to safety and security issues. It can also decrease the efficiency of your facility and make it more susceptible to insects and water.

Fortunately, there are many different ways to repair cracks and other damage in concrete. The first step is to determine the cause of the problem. Once you know the cause, you can begin to repair it. For example, if the crack is caused by moisture, you can use epoxy injection to fill the cracks and keep them from growing larger. However, this method only treats the surface and does not address the underlying issue. It is important to use a professional contractor when performing this type of work.

Another way to prevent damage to concrete is to perform a routine inspection of the structure. This will allow you to spot problems before they become serious. This can save you time and money, and it will protect your investment in the long run. In addition, it will increase the value of your property.

When choosing a contractor for your concrete restoration project, make sure to find one that is licensed and insured. It is also important to read online reviews and check references. A reputable contractor will have no problem providing you with a list of satisfied customers.

The frequency of maintenance depends on the type of concrete and its location. Preventive maintenance can prevent minor cracks and scuffs from becoming more significant damage, and it is cheaper than waiting to fix the problem later on. This can be especially crucial for buildings and structures that rely on concrete supports or foundations. In addition, preventive maintenance can reduce the risk of injuries to people and damage to nearby structures.

post

Stucco Repair: What You Need to Know

Stucco Repair Philadelphia is something most homeowners with stucco houses will have to deal with at some point. It’s important to take care of it quickly to prevent further damage and keep costs down.Stucco Repair

Small cracks less than 1/4 inch can be filled in with acrylic exterior caulk. For cracks wider than that, a professional will need to use a cold chisel and hammer to widen the crack and bevel it.

Stucco is a durable material capable of lasting 100 years or more when it’s properly installed and maintained. But it can be damaged by many different things. Moisture is one of the most common causes. If your stucco is not caulked correctly around windows and doors, moisture can build up behind the material and cause mold, wood rot, and buckling. In addition, impacts from woodpeckers or stray baseballs can leave small chips in the surface, and your home’s settling can cause cracking.

If you notice any of these signs, it’s time to call a professional. A professional can inspect your stucco and recommend the best course of action. They will check for underlying issues, such as water damage, and repair or replace the affected materials. They can also help you choose the right color to match your existing stucco.

The cost of repairing stucco depends on the severity and extent of the damage. Large cracks, for example, can be much more costly to fix than smaller ones. Additionally, if the cracks are in hard-to-reach places, it will increase the overall cost of the project.

It’s important to choose a reputable contractor to perform your stucco repair. Be sure to look for testimonials and reviews. You should also make sure that your contractor is licensed and insured. This will protect you from scams and ensure that the job is completed to your satisfaction.

In addition to the cost of materials, you should also consider other associated costs. These may include labor setup time, mobilization charges, and minimum hourly charges. You should also add in any cost of removing, modifying, or repairing existing framing, surfacing, and/or HVAC, plumbing, or electrical systems to bring them up to code. Finally, don’t forget to include any permit or inspection fees that you might need to pay.

If you’re thinking of tackling a DIY stucco project, be aware that it can be very time-consuming and complicated. Even if you’re very handy, it’s often easier to hire a professional to handle the work for you. Not only will this save you time, but it will also prevent costly mistakes that could cost you a lot of money down the road.

Materials

Stucco is a popular exterior finish for homes, but it requires regular maintenance. Moisture is one of the biggest culprits in plaster deterioration. It enters a building through cracks, around chimneys, and window and door openings. It can also get behind lath that is torn or not properly lapped at the seams.

When moisture is allowed to enter the home, it can lead to mildew and mold, ugly discoloration on the outside, and wall rot that can destroy the structural integrity of the walls. The most common way to manage moisture is by installing an air barrier, but even if you have done this, it can be difficult to know what to do when water leaks into your home’s plaster.

The best way to avoid water damage is to make sure that all cracks are closed with waterproof caulking. This is an easy DIY project that can save you money on repair costs. A standard caulking kit from Quikrete costs about $30 and includes everything you need to repair hairline cracks.

To start your stucco repair, remove any loose flakes of paint from the surface. Then, use the wire brush to clean the area around the crack. This will help the new stucco patch stick better. You should also vacuum up any dust that has accumulated in the cracks. Finally, spray the area with water to moisten the surface and prepare it for patching.

If you’re not comfortable doing the job yourself, you can hire a professional to handle it for you. It’s important to work with a contractor that has experience with stucco repairs and can offer you a warranty for their work.

Before starting the repair, it’s important to protect yourself by wearing a face mask and safety glasses. Using a hammer and cold chisel, widen the crack to at least a quarter inch and remove any loose pieces of stucco. It’s also a good idea to remove any damaged wire mesh lath that may be present.

Once the crack is widened, cut a piece of grade-D builder’s paper to fit the size of the repair area and secure it to the sheathing with roofing nails. Next, add a piece of fiberglass or galvanized metal lath and trim it to fit the opening with tin snips.

Safety

A stucco repair expert must be careful not to damage the surrounding area during this project. This can cause the cracks in your stucco to widen, which could result in even more damage. It is also important that the weather conditions be ideal for this project. Stucco can’t be worked on if it’s too cold or too hot, as this will affect how well the cement and water mix. This can lead to poor-quality repairs and may even make the problem worse.

A good way to assess the condition of your stucco is to look for cracks and chips. These signs indicate that the weather is starting to wear away at the surface, and it’s time for a stucco repair. You should also check for leaking areas and any moisture problems in the building’s sheathing, insulation, and framing. These are major issues that can lead to rot, mold growth, and structural problems.

Another sign that it’s time to call in a stucco repair professional is if your walls are showing signs of wildlife damage. Termites, squirrels, woodpeckers, and other creatures have been known to munch on stucco, leaving holes that can cost thousands of dollars in damages each year. This can be avoided if you spot any damage early and have it addressed as soon as possible.

Gaps around windows and doors are another sign that the stucco needs to be repaired. These gaps allow moisture to seep into the walls, which can lead to water damage and other problems. A stucco repair expert should be able to seal these gaps and prevent further moisture intrusion.

When repairing stucco, it’s important to use a high-quality material. This will ensure that the patch you install is long-lasting and durable. It’s also a good idea to buy a stucco repair mix that can be easily tinted. This will help you match the color of your existing stucco and give it a consistent appearance.

If you’re planning to do the staining and painting yourself, it’s best to choose a waterproof material. This will protect the underlying framing and sheathing from moisture damage and prevent mold and rot from growing. It will also make it easier for you to maintain your new stucco.

Time

Stucco repair can take a while because the process is more involved than simply patching a small crack or hole. A stucco professional may need to remove old plaster, apply a base coat, and then add the final coats of stucco. These steps can be very time-consuming and often require the use of special tools. The location of the damaged areas can also affect the amount of time that it takes to complete a stucco repair project. For example, if the damage is on the second or third story of a home, then the stucco professional will need to climb ladders and scaffolding to access the area. This can increase the cost of the project and add to the overall timeline.

In addition to the time needed to perform the actual repair work, it can also take a while for the plaster to dry. This is because the stucco must cure completely before it can be painted or otherwise finished. Typically, this process can take between 24 and 72 hours, depending on the weather conditions.

If a homeowner wants to speed up the drying process, they can spray the stucco with water or another liquid. However, this method is only recommended for minor cracks that are less than 1/16 of an inch in width. It should not be used to repair larger cracks or holes, which can cause structural problems for the home.

When stucco becomes chipped or crumbling, it should be inspected by a stucco repair professional immediately. This is because it could be a sign of water damage, foundation settling, or a pest infestation.

Moisture penetration through cracks in the stucco can lead to water damage, rot, and mold growth. Leaving the problem untreated can lead to expensive repairs and potential health issues for a homeowner.

A homeowner should look for signs of moisture penetration, including a musty or sour smell, soft spots, or indentations. The homeowner should also check the structure of the home for leaks or a foundation issue. There are surface scanners available that can be run over the stucco to determine moisture levels. However, these are not entirely accurate or definitive and should be used in conjunction with invasive testing.